
End Truck RT/RS Manual

Read the instructions supplied with the hoist before installation and commissioning.

Keep the instructions in a safe place for future reference.
Table of contents
1 Safety instructions
1.1 Safety instructions for preparing to install the end truck
1.2 Safety instructions for installing and operating the end truck
1.3 Safety instructions for servicing the end truck
2 End Truck RT09/RT11/RS11/RT14/RS14
2.1 General
2.2 Main components
2.3 Assembling the end truck
2.4 Inspection and service procedure for end truck
2.5 Removing and replacing the drive wheel
2.6 Removing and replacing the idler wheel
2.7 Inspection and servicing intervals
3 End Truck RT20/RT25/RT32/RT50
3.1 General
3.2 Main components
3.3 Assembling the end truck
3.4 Inspection and service procedure for end truck
3.5 Removing and replacing the drive wheel
3.6 Removing and replacing the idler wheel
3.7 Inspection and servicing intervals
4 Lubricants
4.1 Alternative lubricants
5 Recommended tightening torques
6 Spare Parts
6.1 RT09
6.2 RT11/RS11
6.3 RT14/RS14
6.4 RT20
6.5 RT25
6.6 RT32
6.7 RT50
1 Safety instructions
1.1 Safety instructions for preparing to install the end truck
Follow these instructions when preparing to install the end truck:
- Ensure that the installation personnel are competent and qualified, and they are provided with adequate instructions for carrying out the installation work.
- Check for any dimensional nonconformances in the drawings, instructions, parts and structural measurements.
- Beware of other moving machinery - such as machines, other cranes and automatic doors - in the installation and servicing area. The installation area must be arranged so that operation of other equipment in the area does not endanger the installation workers (or vice versa).
- Prevent unauthorized persons and bystanders from walking in or under the work site.
1.2 Safety instructions for installing and operating the end truck
Follow these instructions when installing the end truck:
- Use proper safety equipment to prevent objects from falling when working in high places.
- Ensure that machinery and equipment cannot start up accidentally and cannot be moved during installation or servicing.
- Keep the installation and servicing locations and the walkways leading to them, clean and tidy.
Follow these instructions when operating the end truck:
- The useful lifetime of the end truck depends heavily on whether the end truck is properly applied. Do not use the end truck for other than the duty group classification for which it was designed or selected for.
- When traveling, make sure that the moving parts do not collide with objects or people.
- If defects have been noticed in the end truck, carry out the necessary inspections and repair work. Be sure that the end truck operates properly before you start to use it again.
1.3 Safety instructions for servicing the end truck
Follow these instructions when servicing the end truck:
- Carry out regular inspections and preventive maintenance in compliance with the instructions. Keep a record of inspections and servicing. Regular servicing and inspection procedures are necessary for the safe and efficient operation of the end truck. In uncertain or unusual cases, contact the supplier of the end truck.
- Use trained service personnel authorized by the manufacturer of the end truck for servicing the end truck. The person servicing the end truck must be competent for the task and must be familiar with the servicing and inspection instructions.
- Use only genuine spare parts approved by the manufacturer of the end truck.
- Any modifications or additions made to the frame of the end truck must first be discussed with the supplier of the end truck.
2 End Truck RT09/RT11/RS11/RT14/RS14
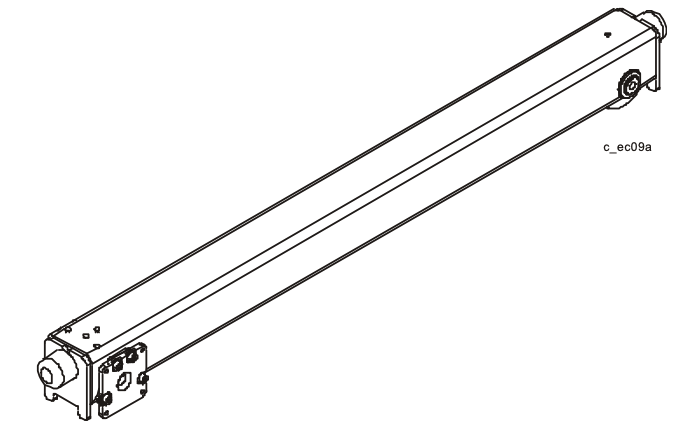
2.1 General
End trucks are designed to carry the crane or hoist as a pair. Any other kind of use must be designed case by case. The end truck is suitable for both indoor and outdoor use.
2.2 Main components
One of the main components of end truck is the wheels. The standard end truck is equipped with a drive wheel and an idler wheel, two drive wheels can be furnished on the truck when needed.
Wheels are prealigned at the factory and cannot be realigned in the field.
Any welding near the wheels may affect the wheel alignment.
2.3 Assembling the end truck
Ensure that the working area is safe.
- Align and square the main girder to the end truck. Measure the cross length at the holes that are located on the top surface of the end truck above the wheels or at the pin holes in joint plate.
- The outer flange of the wheels is machined and can be used for measuring the rail gauge (span).
- The joint plate can be aligned and welded to the main girder when it is separated from the end truck.
If the joint plate has been removed from the end truck, make sure that all parts such as the friction rings, support plates are properly reinstalled before tightening the bolts and using the crane.
- Tighten the joint plate bolts to the recommended tightening torque. (see ‘Recommended tightening torques’ section).
The joint plate bolts are hand-tightened at the factory and must be properly tightened when building the crane.
2.4 Inspection and service procedure for end truck
The following inspections and servicing procedures must be performed at regular intervals. See 'Inspection and servicing intervals' section for the inspections and servicing schedule.
- Check the tightness of the bolts on the end truck.
- Check the wheel for excessive wear.
Some wearing on the wheels is normal. If wearing of the wheels affects the movement of the crane, replace the wheels.
- The wheel bearings (RT09-RT/RS14) are permanently lubricated with grease and do not need additional lubrication.
2.5 Removing and replacing the drive wheel
Ensure that the working area is safe and the crane cannot be started accidentally when servicing. Be sure to switch off and lock out power at the main switch to avoid an electrical hazard.
- Disconnect the power supply plug from the motor.
- Remove the mounting bolts from the drive.
- Remove the drive from the end truck.
- Jack up the end truck to lift the wheel off the rail.
- Remove the bearing housing from each side of the end truck.
- Remove the wheel from under the end truck.
2.6 Removing and replacing the idler wheel
Ensure that the working area is safe and the crane cannot be started accidentally when servicing. Be sure to switch off and lock out power at the main switch to avoid an electrical hazard.
- Jack up the end truck to lift the wheel off the rail.
- Remove the retaining rings from shaft.
- Make sure the support sleeves and shimming washers do not drop out when removing the rings.
- Pull out the shaft from end truck.
- Remove the wheel from under the end truck.
2.7 Inspection and servicing intervals
The inspection and servicing interval for the end truck is 12 calendar months for a crane in an 8-hour per day, 5-day per week work period, under normal environmental conditions (free from excessive dust, moisture, and corrosive fumes). The inspection and servicing intervals of the end trucks could be defined by Safe Working Periods (SWPs) if it is being monitored. If the Safe Working Periods (SWPs) is being monitored, then the servicing interval must always be carried out at the end of the Safe Working Period (SWP%) of the crane or hoist, or by the end of the stated number of calendar months, whichever comes first. If the end trucks are being used intermittently, they should be inspected before being used again.
If the duty is heavier, or the environment severe, service intervals should be shortened and more frequent.
Only authorized or adequately-trained personnel may carry out service or repair work. If any defects or abnormalities are observed, they must be investigated and corrective action must be taken in accordance with the instructions.
3 End Truck RT20/RT25/RT32/RT50
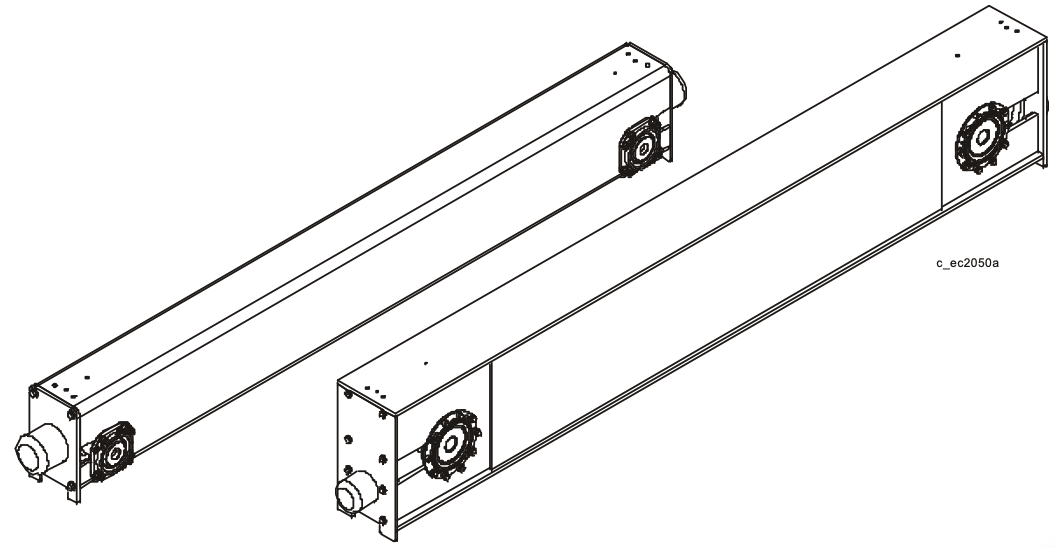
3.1 General
End trucks are designed to carry the crane or hoist as a pair. Any other kind of use must be designed case by case. The end truck is suitable for both indoor and outdoor use.
3.2 Main components
One of the main components of end truck is the wheels. The standard end truck is equipped with a drive wheel and an idler wheel, but two drive wheels can be furnished on the truck when needed.
Wheels are prealigned at the factory and cannot be realigned in the field.
Any welding near the wheels may affect the wheel alignment.
3.3 Assembling the end truck
Ensure that the working area is safe and the machine cannot be started accidentally when doing the assembly work.
- Align and square the main girder to the end truck. Measure the cross length at the holes that are located on the top surface of the end truck above the wheels or at the pin holes in joint plate.
- The outer flange of the wheels is machined and can be used for measuring the rail gauge (span).
- The joint plate can be aligned and welded to the main girder when it is separated from the end truck.
If the joint plate has been removed from the end truck, make sure that all parts such as the friction rings, support plates are properly reinstalled before tightening the bolts and using the crane.
- Tighten the joint plate bolts to the recommended tightening torque. (see ‘Recommended tightening torques’ section).
The joint plate bolts are just loosely preassembled at athe factory and must be properly tightened when building the crane.
3.4 Inspection and service procedure for end truck
The following inspections and servicing procedures must be performed at regular intervals. See 'Inspection and servicing intervals' section for the inspections and servicing schedule.
- Check the tightness of the bolts on the end truck.
- Check the wheel for excessive wear.
Some wearing on the wheel is normal. If wearing of the wheel affects the movement of the crane, replace the wheel.
- Lubricate the wheel bearings.
3.5 Removing and replacing the drive wheel
Ensure that the working area is safe and the crane cannot be started accidentally when servicing. Be sure to switch off and lock out power at the main switch to avoid an electrical hazard.
- Disconnect the power supply plug from the motor.
- Remove the mounting bolts from the drive.
- Remove the drive from the end truck.
- Jack up the end truck to lift the wheel off the rail.
- Remove the bearing housing from each side of the end truck.
- Pull out the bearing from wheel (when the bearing is mounted in the wheel).
- Remove the wheel from end truck.
- Reassemble in the reverse order.
3.6 Removing and replacing the idler wheel
Ensure that the working area is safe and the crane cannot be started accidentally when servicing. Be sure to switch off and lock out power at the main switch to avoid an electrical hazard.
- Jack up the end truck to lift the wheel off the rail.
- Remove the mounting bolts from the drive.
- Remove the bearing housing from each side of the end truck..
- Remove the bearing from wheel (when the bearing is mounted in the wheel).
- Remove the wheel from end truck.
- Reassemble in the reverse order.
3.7 Inspection and servicing intervals
The inspection and servicing interval for the end truck is 12 calendar months for a crane in an 8-hour per day, 5-day per week work period, under normal environmental conditions (free from excessive dut, moisture, and corrosive fumes). The inspection and servicing intervals of the end trucks could be defined by Safe Working Periods (SWPs) if it is being monitored. If the Safe Working Periods (SWPs) is being monitored, then the servicing interval must be carried out at the end of the Safe Working Period (SWP%) of a crane or a hoist, or by the end of the stated number of calendar months, whichever comes first. If the end trucks are being used in intermittently, they should be inspected before being used again.
If the duty is heavier, or the environment severe, service intervals should be shortened and more frequent.
Only authorized or adequately trained personnel may carry out service or repair work. If any defects or abnormalities are observed, they must be investigated and corrective action must be taken in accordance with the instructions.
4 Lubricants
Use of a low-grade or incompatible lubricant could damage the bearings. Use only the lubricants recommended by the manufacturer.
Factory-installed lubricant unless otherwise specified:

4.1 Alternative lubricants
Alternative lubricants:
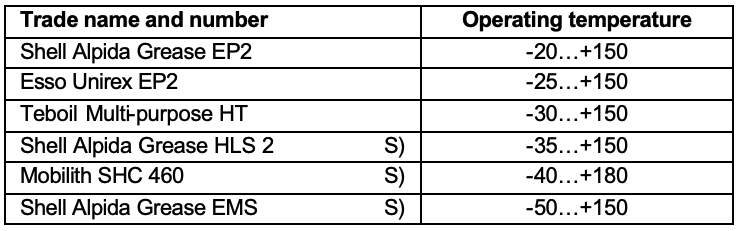
S) Synthetic lubricant
If the end truck is operated for long periods in extremely cold conditions (colder than -25°C) or extremely hot conditions (hotter than +55°C), it is recommended that a synthetic lubricant be used.
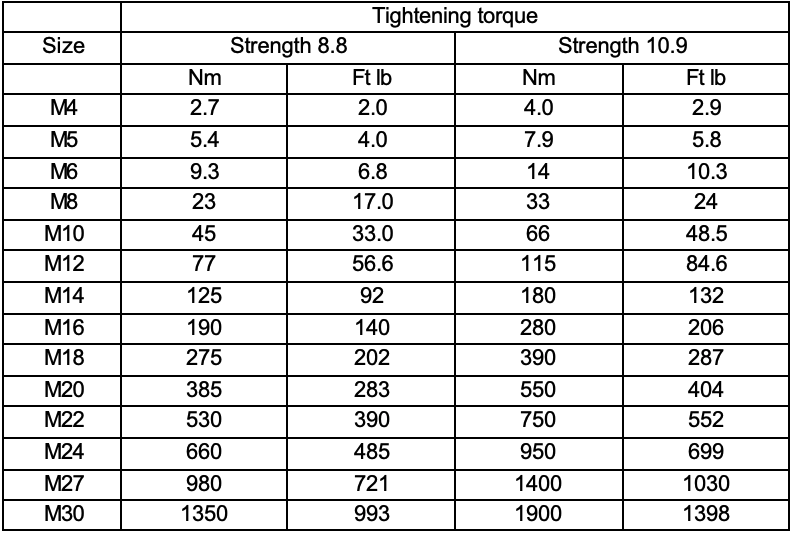
5 Recommended tightening torques
Recommended tightening torques for screws and nuts.
6 Spare Parts
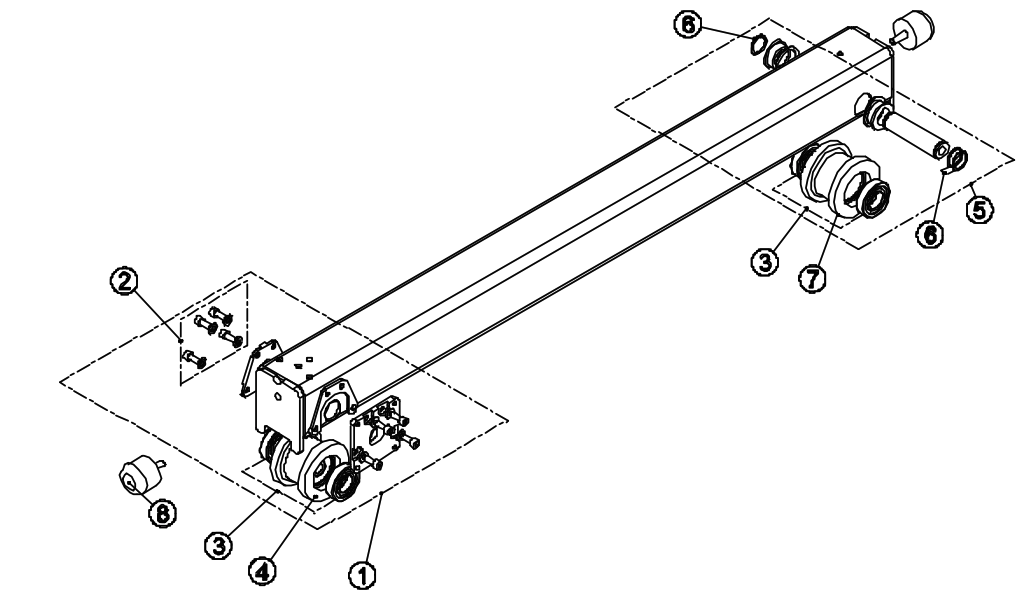
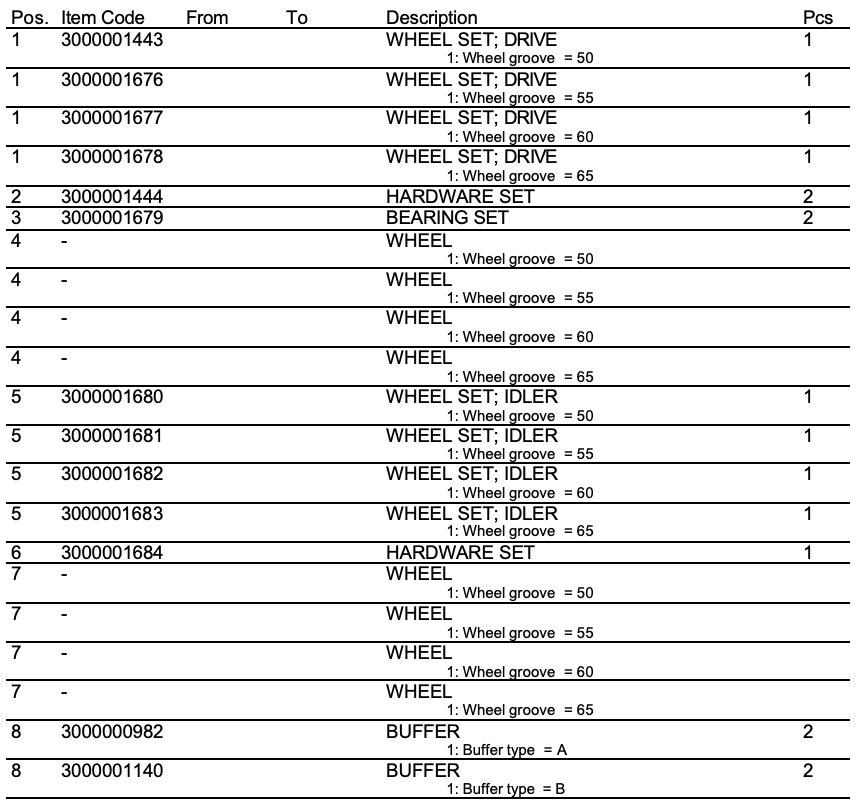
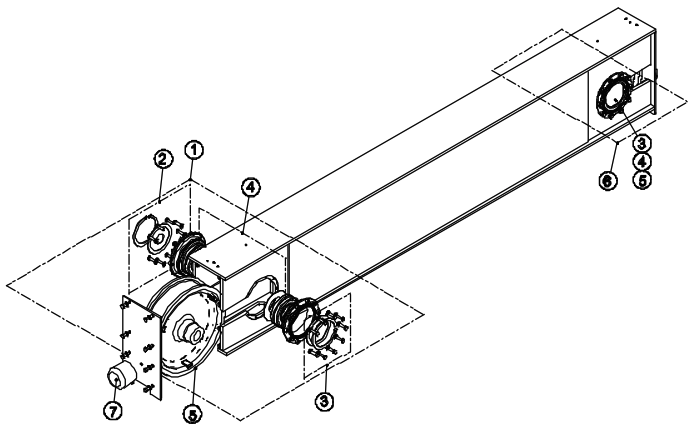
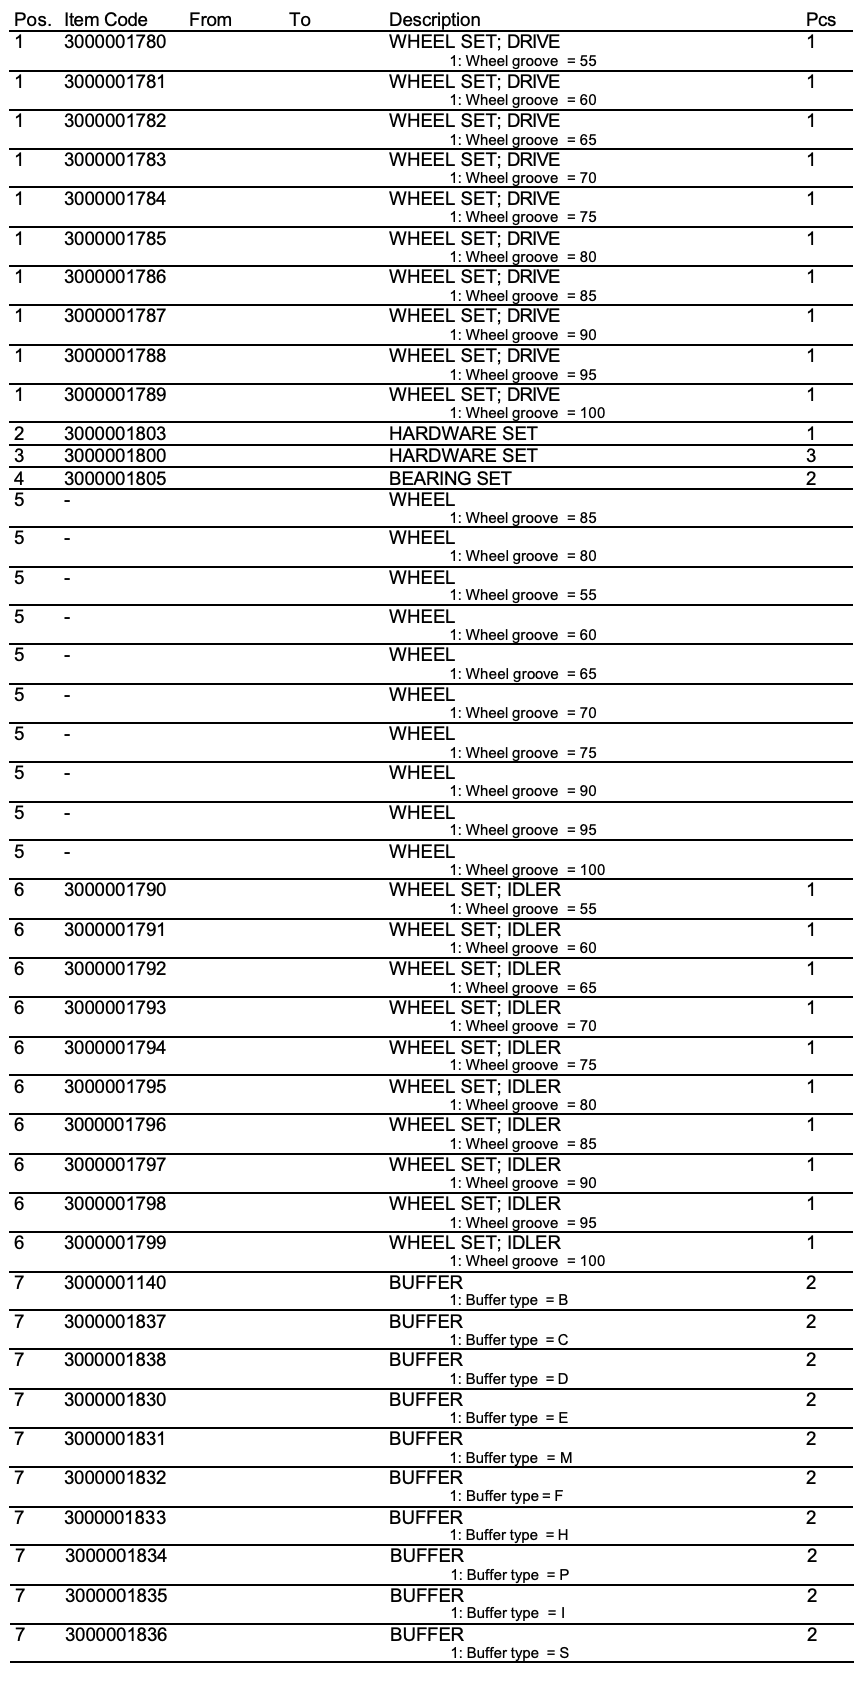
6.1 RT09
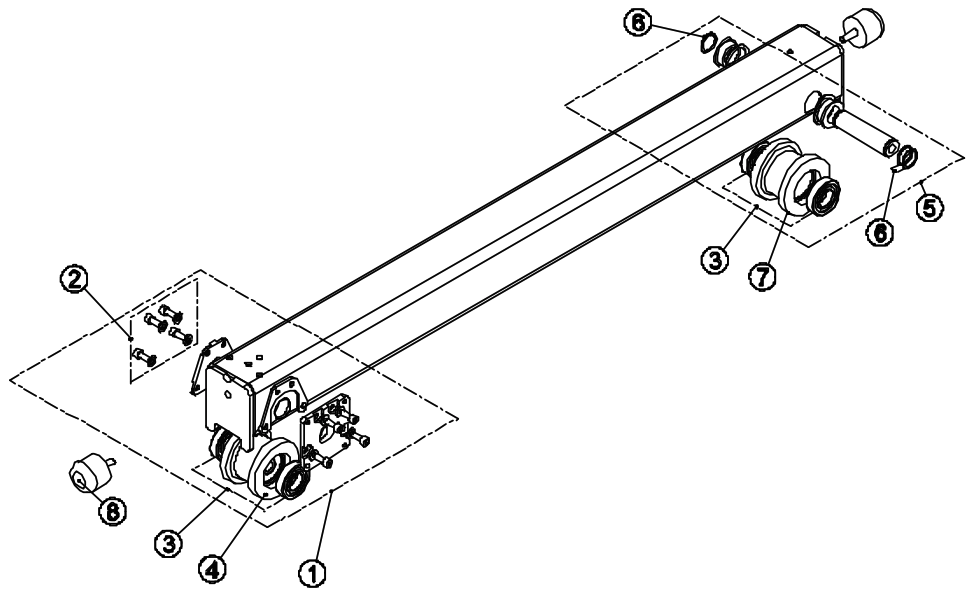
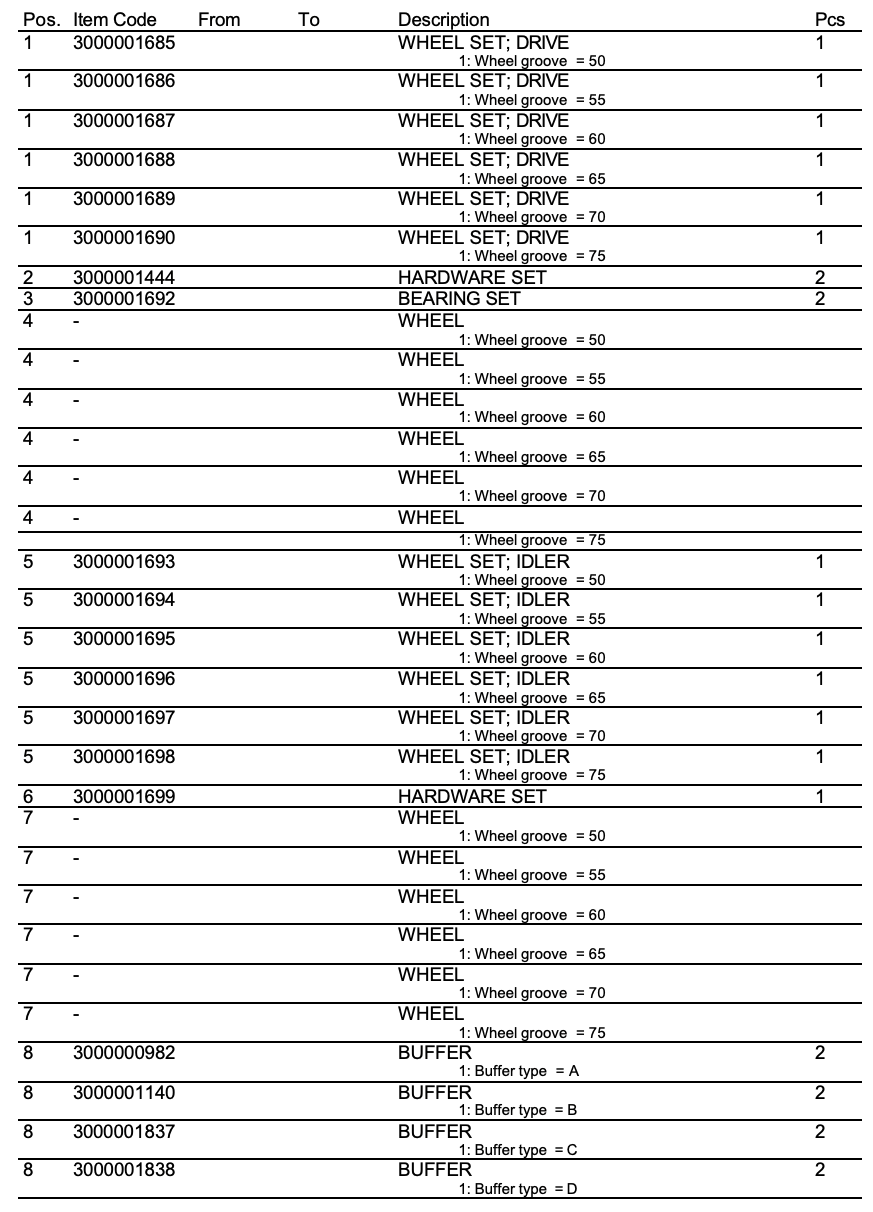
6.2 RT11/RS11
6.3 RT14/RS14
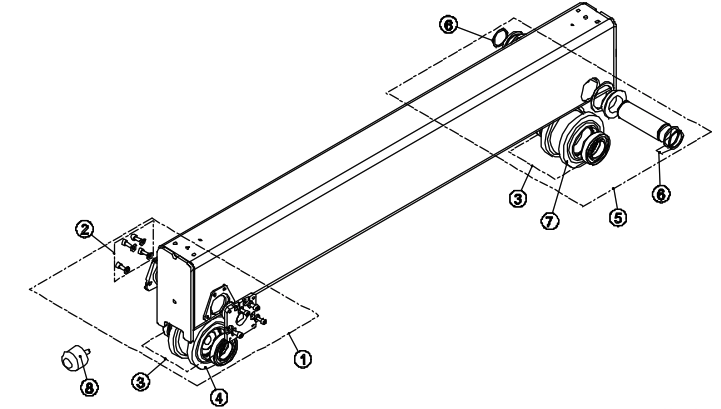
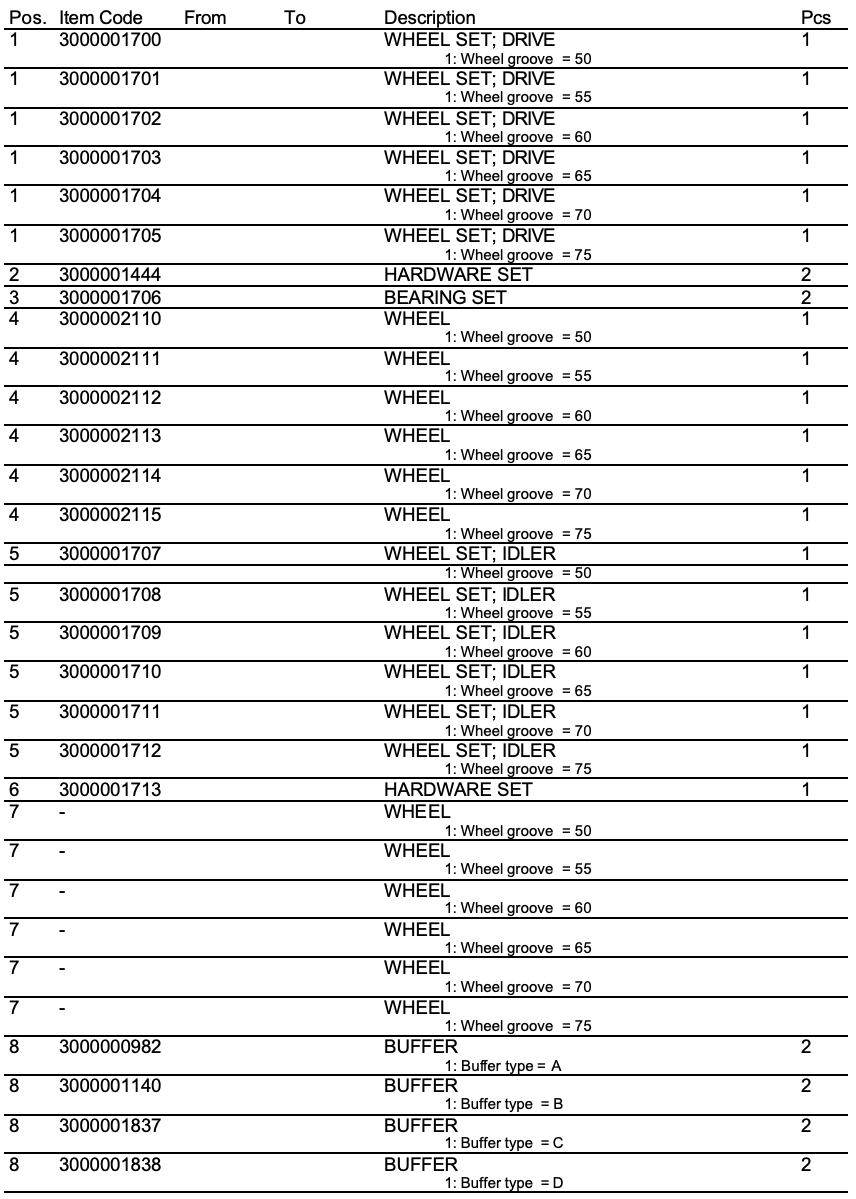
6.4 RT20
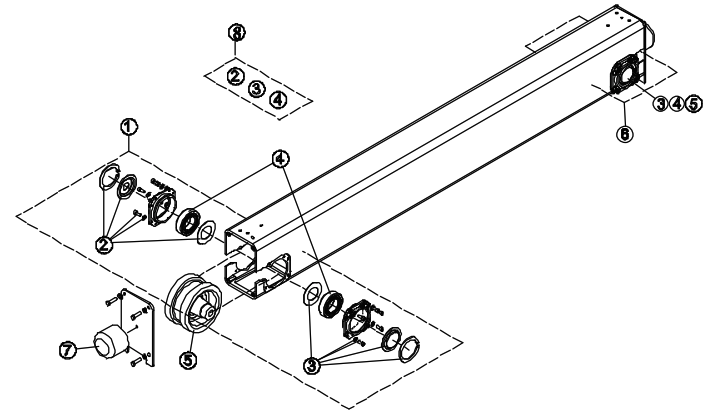
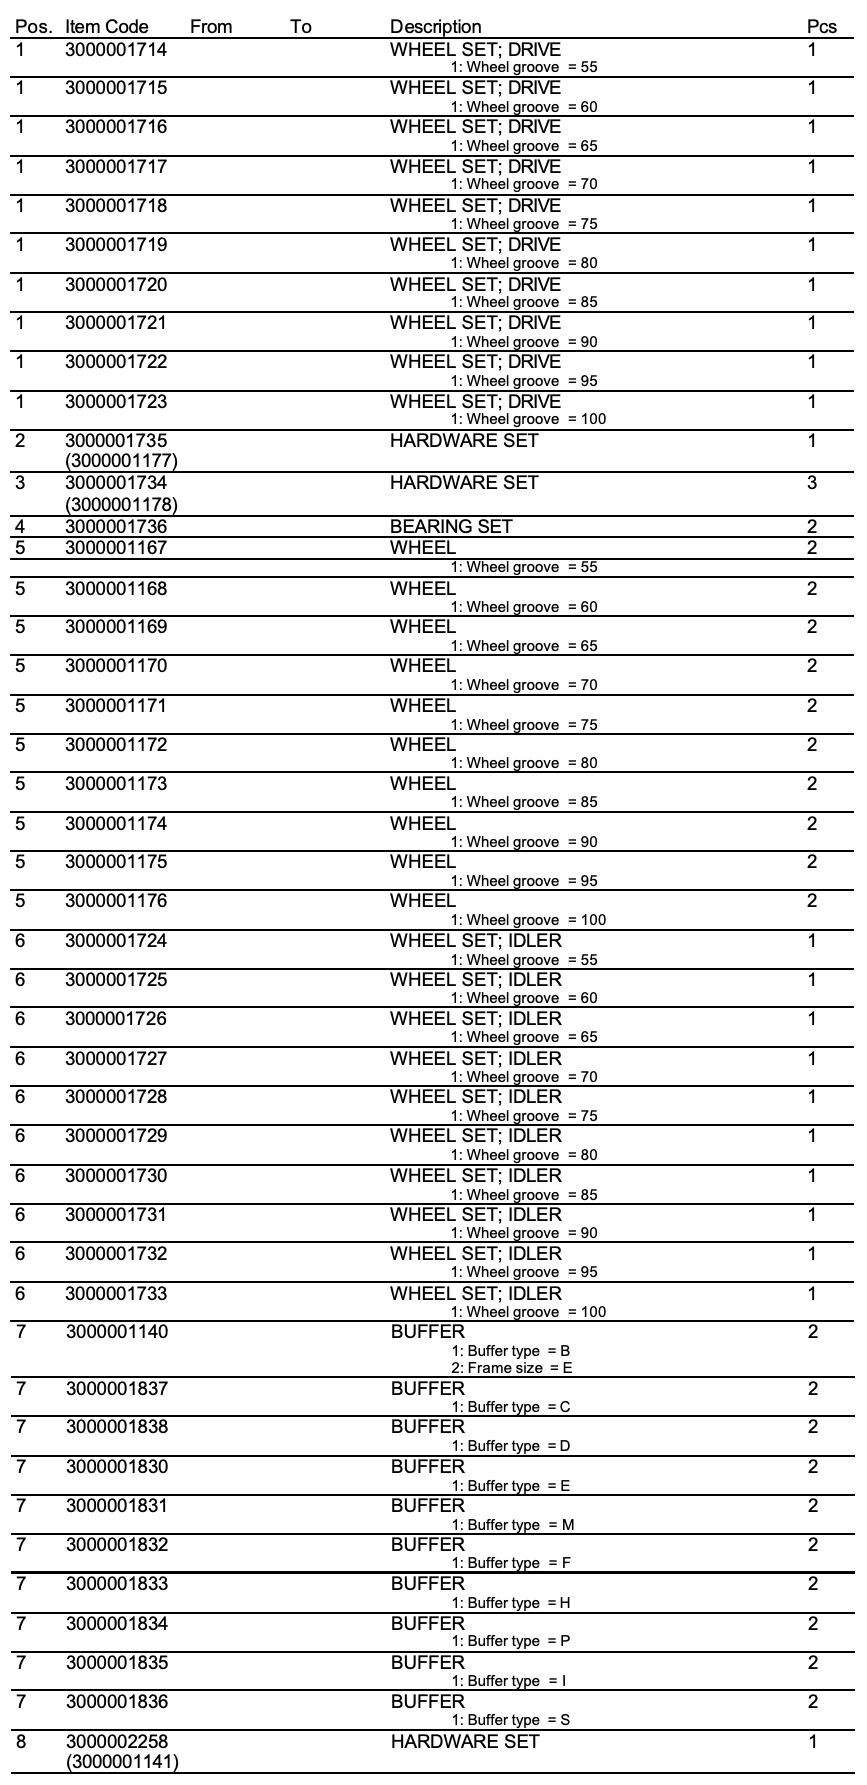
6.5 RT25
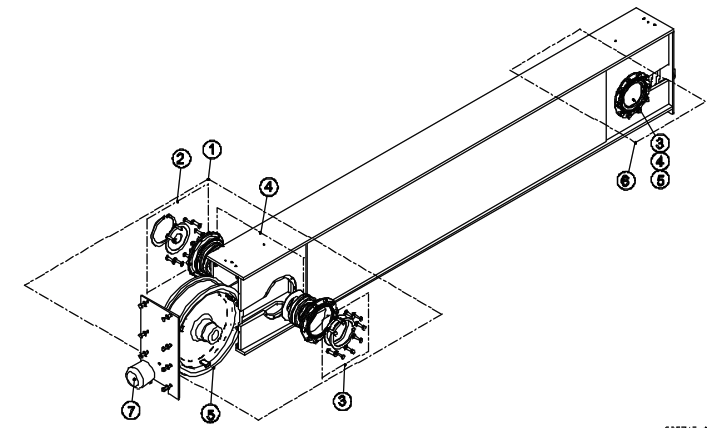
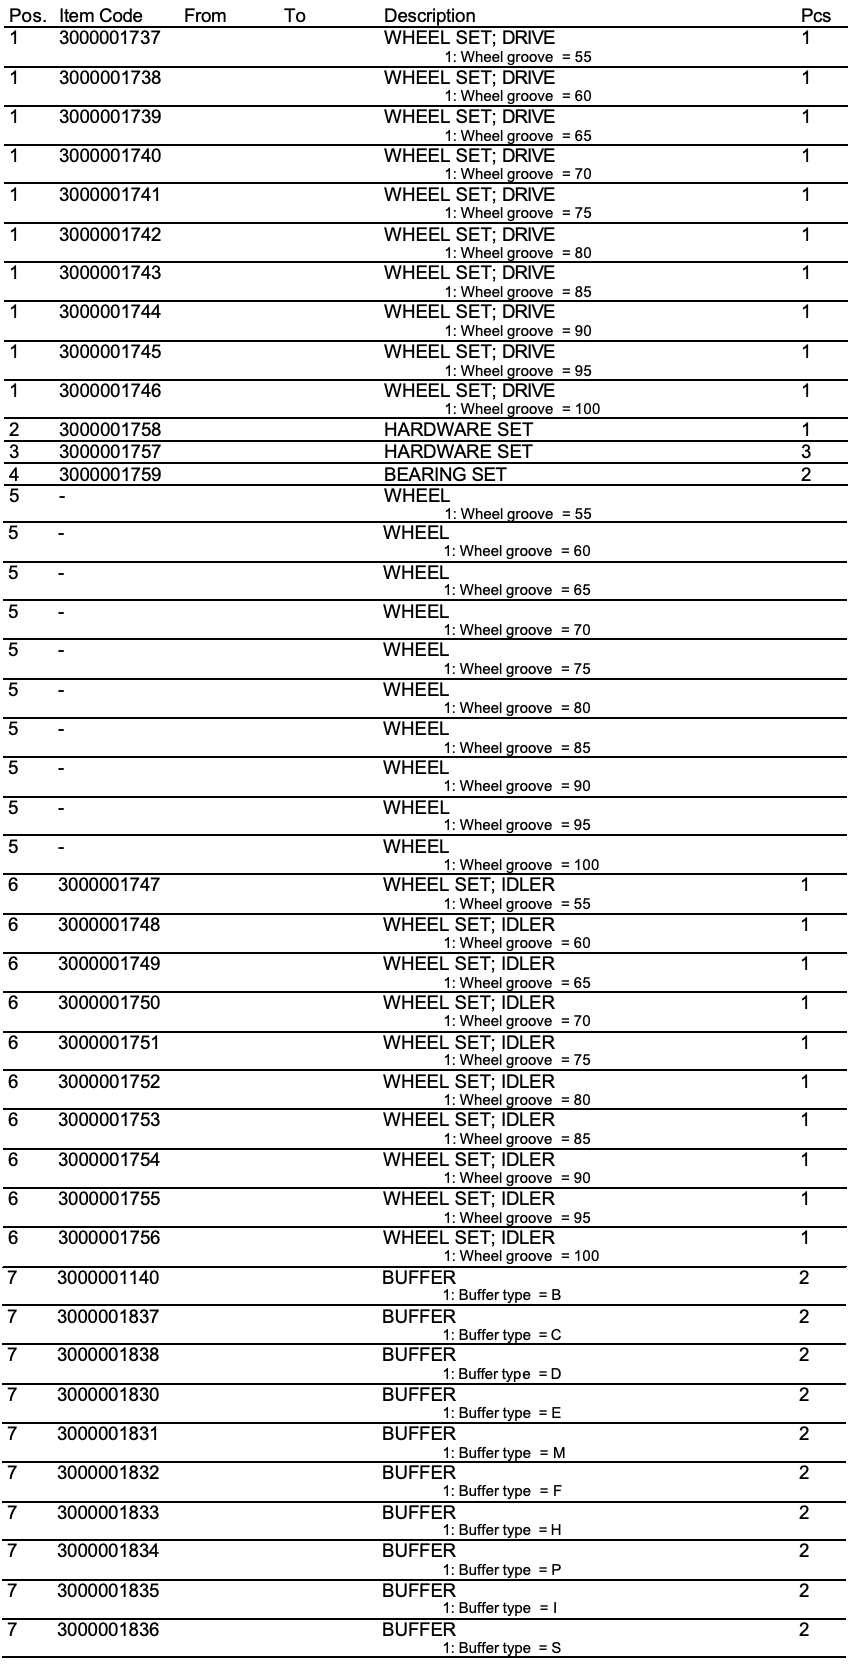
6.6 RT32
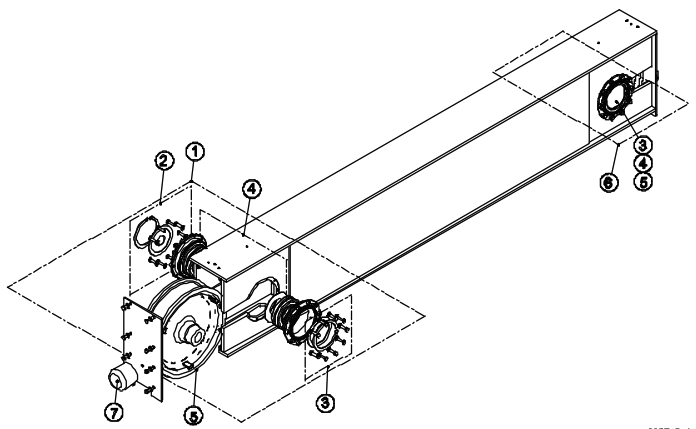
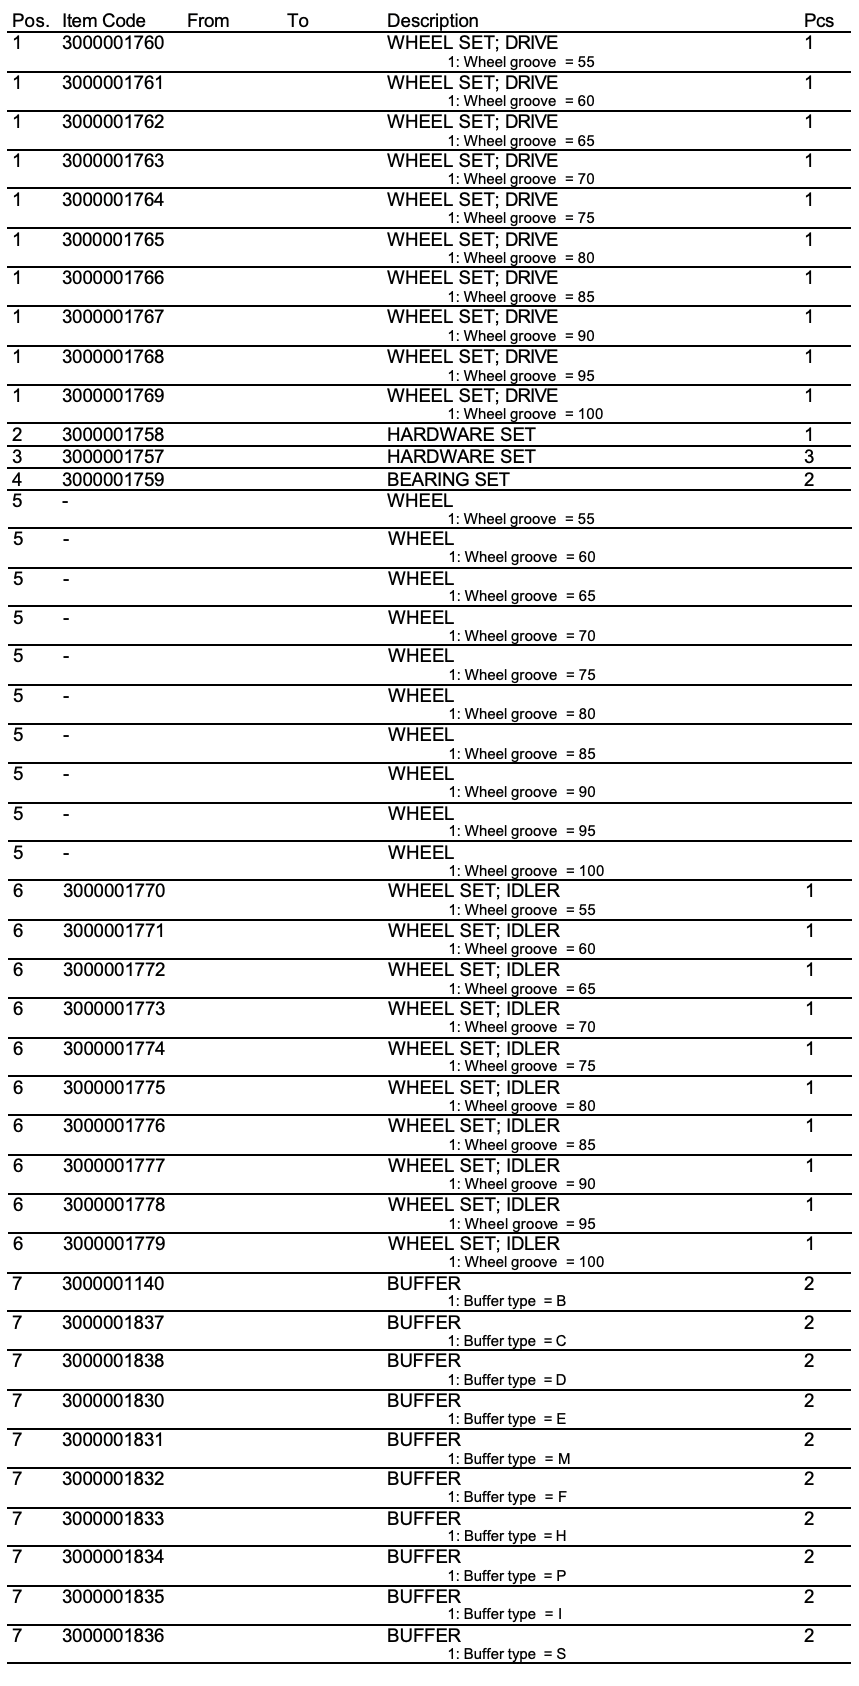
6.7 RT50
*R&M Materials Handling, Inc. reserves the right to alter or amend the above information without notice.